Lesson 11 - DS18B20 Temperature Sensing.
Raspberry PI has no ADC converter, but luckly as of Dec 2012 Occidentalis and Raspbian support the DS18B20
The DS18B20 is a 1-wire Temperature sensor -
From Wikipedia: http://en.wikipedia.org/wiki/1-Wire
1-Wire is a device communications bus system designed by Dallas Semiconductor Corp. that provides low-speed data, signaling, and power over a single signal.] 1-Wire is similar in concept to I²C, but with lower data rates and longer range
One distinctive feature of the bus is the possibility of using only two wires: data and ground. To accomplish this, 1-wire devices include an 800 pF capacitor to store charge, and power the device during periods when the data line is active.
The DS18B20 has 3 pins, and only requires power (3.3v, ground, and a data line), It comes in different packages (sensor plus, waterproof, or high temperature) The DS18B20 can be used on the same data line, as other DS18B20, and only requires one extra pull-up resistor.
So the wiring is pretty simple:
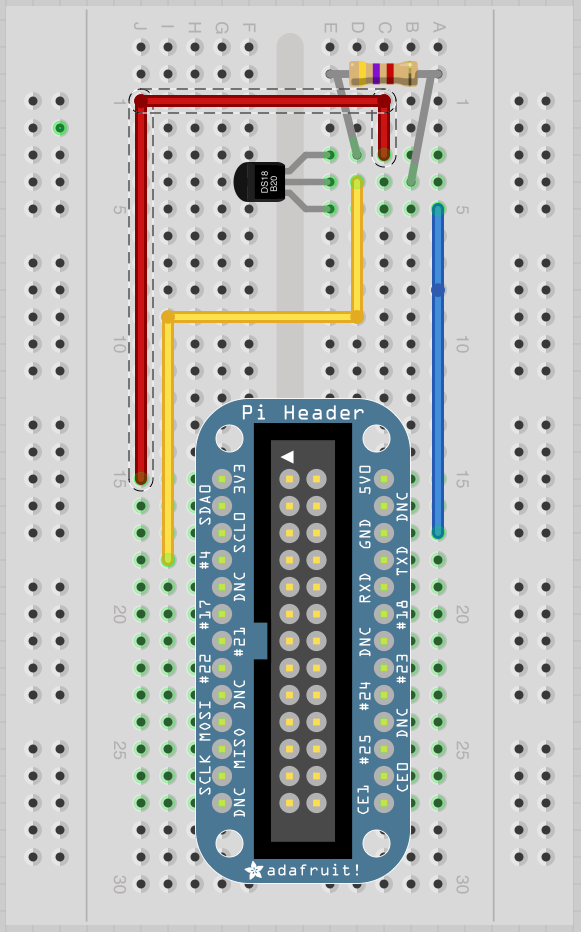
Of course my breakout board is different, but that doesn’t really matter.
This is where it gets interesting thou - The driver for the DS18B20 creates a “file” or pseudo-file
And to read the temperature you just have to read the file.
First you have to load the drivers into the Kernel. This is done with the linux “modprobe” command.
sudo modprobe w1-gpio
sudo modprobe w1-therm
cd /sys/bus/w1/devices
ls
cd 28-xxxx (xxxx will be the serial number of the device)
cat w1_slave
sudo - stands for “Super User Do” - This give whatever program that follows it advanced super powers - (Linux world it means run this as the root/admin user) (Windows world this would be like run as “Administrator” but with more power) “SUDO” is a very powerful command, and normally doesn’t ask for permission to do something, so if you give a destructive command super power - that could be a very bad thing.
Modprobe is used to add a loadable kernel module to the linux kernel.
cd will change into a directory (think old school DOS)
ls is a listing of the files in that directory (DOS equivalent of DIR)
cat reads a file (it has other uses as well, but primary it displays the contents of a file, DOS equivalent is probably TYPE?)
So what will be displayed will look something like this:
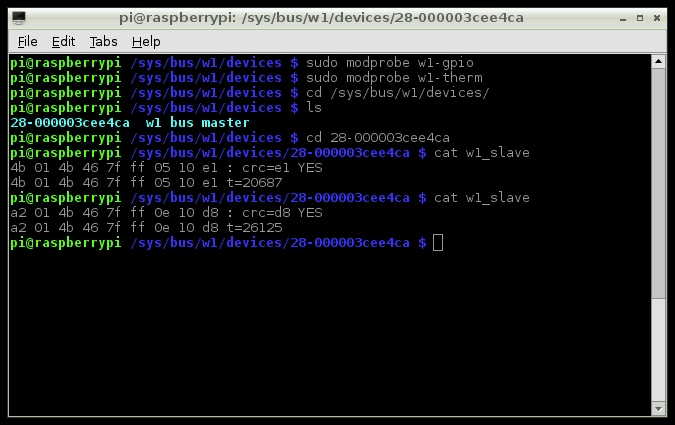
You see each time you read the file, the contents have changed a little, this normal, it’s a good thing, it means the sensor is working.
Adafruit says that this interface will be a little unstable, and a little unreliable, but it does give us the information we need.
The response from the sensor will either have a YES or NO at the end of line one. If it’s YES then we have valid temperature readings at the end of line two.
In the example above, t=20687 & t=26125 the tempature is 20.687 degrees C and 26.125 degrees C. Pretty neat huh?
IF more then one DS18B20 is hooked up you will have multiple 28-xxxx directories, all with there own unique information and temperatures.
So now for the python - and where the real magic happens:
This program is fairly simple and straight forward:
import os
import glob
import time
os.system('modprobe w1-gpio')
os.system('modprobe w1-therm')
base_dir = '/sys/bus/w1/devices/'
device_folder = glob.glob(base_dir + '28*')[0]
device_file = device_folder + '/w1_slave'
def read_temp_raw():
f = open(device_file, 'r')
lines = f.readlines()
f.close()
return lines
def read_temp():
lines = read_temp_raw()
while lines[0].strip()[-3:] != 'YES':
time.sleep(0.2)
lines = read_temp_raw()
equals_pos = lines[1].find('t=')
if equals_pos != -1:
temp_string = lines[1][equals_pos+2:]
temp_c = float(temp_string) / 1000.0
temp_f = temp_c * 9.0 / 5.0 + 32.0
return temp_c, temp_f
while True:
print(read_temp())
time.sleep(1)
So Lets look at this line by line:
import os - This is the library that tell python that at some point you are going to be using system commands. https://docs.python.org/2/library/os.html
import glob - The glob module finds all the pathnames matching a specified pattern according to the rules used by the Unix shell. https://docs.python.org/2/library/glob.html
import time - This library provides various time-related functions. (We have used this before)
os.system('modprobe w1-gpio')
os.system('modprobe w1-therm') - This two lines setup the device to be used, loading the drivers into the kernel just as they did when we issued the modprobe on the command line.
The next 3 lines try to find the 1st DS18B20 sensor:
base_dir = '/sys/bus/w1/devices/'
device_folder = glob.glob(base_dir + '28*')[0]
device_file = device_folder + '/w1_slave' - And then setup the filename to be read. Remember when we did this on the command line, we had to issue a “ls” command and find the 28-xxxx directory before we could read the “w1_slave” file. This does the same thing. Limitation of this program is that it will only find the first sensor.
def read_temp_raw():
f = open(device_file, 'r')
lines = f.readlines()
f.close()
return lines
This will define a function in python, this should seem familiar to most people.
In This case the function is called “read_temp_raw”, it opens the file from “device_file” as a read only file. Reads the informations in, closes and returns the files in the form of “lines”
def read_temp():
lines = read_temp_raw()
while lines[0].strip()[-3:] != 'YES':
time.sleep(0.2)
lines = read_temp_raw()
equals_pos = lines[1].find('t=')
if equals_pos != -1:
temp_string = lines[1][equals_pos+2:]
temp_c = float(temp_string) / 1000.0
temp_f = temp_c * 9.0 / 5.0 + 32.0
return temp_c, temp_f
This is also a function, this function is called “read_temp” - and what it does is calls the previous function “read_temp_raw”. After it has raw data, it first checks to see if there valid temperature information. IF it has valid data it will look for the “t=” in the 2nd line, and start to do math to both place the decimal point, and convert from celsius to ferinheight. The last line of the function returns both the celsius and fahrenheit values.
while True:
print(read_temp())
time.sleep(1)
This is pretty straight forward, This is a loop with a delay of 1 second between readings.
The print statement will call the 2nd function (read_temp)
So what can we do with this? Well, interesting enough - we can set this up to be a internet of things device and read the temperature of a remote location:
I’m not going to go into how to setup an account on this site, it’s really really simple to do thou. I will go into how to install their python scripts, and then we can remotely view the tempature.
So privateeyepi.com is a DIY home alarm system - and remote monitoring system.
They have projects for home alarm system, temperature sensing (w/DS18B20), using the DHT22 Temperature and humidity sensor, webcam survelliance projects, on/off remote switching projects. siren project, arm/disarm using a switch.
We just care about the temperature sensor for now.

For the most part their tutorial on how to setup the DS18B20 is the same as what we just completed.
Boiling this down to the basics:
issue the following commands on the PI:
sudo apt-get update
sudo apt-get upgrade
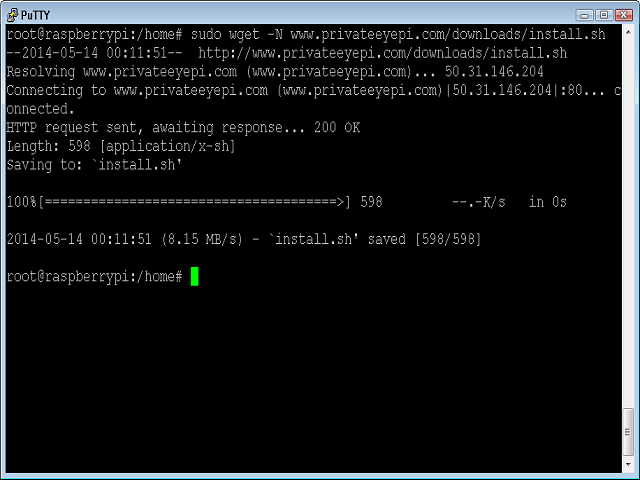
cd /home
sudo wget -N www.privateeyepi.com/downloads/install.sh
sudo sh install.sh
Lets look quickly at this process one by one:
sudo apt-get update - We saw sudo “Super User DO” earlier, this gives apt-get super powers. APT-GET is part of Debain and Debain like linux distros - this is the advanced package manager - This is one way to install new software, and upgrade software that is already installed (software is known as packages in the Linux world) - https://help.ubuntu.com/12.04/serverguide/apt-get.html There are many different package managers, most of the apt based managers pipe their commands to apt-get - apt-get is typically used in the command line, and typically you need to know the name of the package you want to install. The update tells apt to check and see if any packages need updated, if any repositories have changed, etc.
sudo apt-get upgrade - Upgrade - This time we are telling apt to go ahead and upgrade the software it found that has a update - from the previous command. Some times this can take awhile, and sometimes this fails (normal reasons for failure - the distro is no longer supported, or the internet is unstable and the repository can’t be reached, There are ways to correct this but that is out of the scope of this tutorial)
cd /home - We saw something like this earlier too - we are changing to the “home” directory.
sudo wget -N www.privateeyepi.com/downloads/install.sh - Wget is used to retrieve files using HTTP, HTTPS, FTP - Typically/Commenly used to retrieve files that are not in the normal repositories, there are other ways to do this of course, but this is one of the easier ways.
https://www.gnu.org/software/wget/ In this case, we are downloading to the “home” directory a shell script called “install”
sudo sh install.sh - Now we are going to run the shell script, since the script is going to remove files, create directories, modify file permissions, and install new software, we need to give it Super Cow powers. This can be dangerous if you don’t know where the script came from, remember normally “sudo” does not ask for permission to do anything. So I said that apt-get was the normal way to install software, this is true, Sometimes, software just isn’t in the normal repositories, in this case, most of what we are doing is going to “wget” some python scripts. (or rather a .zip file that contains the python scripts). SH invokes a shell interpreter to run the file (in this case BASH shell) - (Think of a shell script as like a DOS .bat file, it processes each line one by one until the script is done just like a batch file would do in the DOS world)
Looking at the Install.SH
sudo rm -f pep.zip
sudo mkdir -p pep_backup
sudo mv alarm.py pep_backup 2>/dev/null
sudo mv restarter.py pep_backup 2>/dev/null
sudo mv alarmfunctionsr.py pep_backup 2>/dev/null
sudo mv dht22.py pep_backup 2>/dev/null
sudo mv dallas.py pep_backup 2>/dev/null
sudo mv rfsensor.py pep_backup 2>/dev/null
sudo mv globals.py pep_backup 2>/dev/null
sudo wget www.privateeyepi.com/downloads/pep.zip
unzip -o pep.zip
sudo chmod 777 alarm.py
sudo chmod 777 dallas.py
sudo chmod 777 globals.py
sudo chmod 777 alarmfunctionsr.py
sudo chmod 777 dht22.py
sudo chmod 777 restarter.py
sudo chmod 777 pep_backup
sudo apt-get install python-serial
You probably by now already have an idea of what is going on here, But I’ll run over a few things we haven’t seen yet.
rm - remove a file or directory (if you own the file that you want to remove you don’t need Super Cow powers) If you don’t own it you do.
mkdir make a directory - IF you own the directory you are making a new directory in you typically don’t need super cow powers, however if you don’t own the parent directory you will need super cow.
mv - move a file to a directory (Depending on where and what file you are moving will depend on if you need super cow powers)
unzip - unzip a file
chmod - change access permission, change mode of a file - The 777 in those lines say that everyone can read/write/execute the file. The first number is Owner rights, the 2nd number is Group rights, and the 3rd number is Other rights (sometimes called World) Some scripts need to have execute rights, and others don’t, it depends on what the script is doing and who owns it.
http://ss64.com/bash/chmod.html CHMOD almost always need super cow powers, there are very few exceptions that I can think of.
The install script will install the following python scripts:
alarm.py - Is used in the alarm system project.
dallas.py - Is used for monitoring temperature using the DS18B20 sensor.
dht22.py - Is used for monitoring temperature and humidity using the DHT22 sensor.
rfsensor.py - Is used for interfacing a range of wireless sensors (wireless switch, wireless temperature sensor, wireless motion sensor and a wireless relay).
restarter.py - Is a utility you can use to automate the above programs so that they automatically restart whenever you restart your Raspberry Pi. This also enables you to run multiple programs (e.g. alarm.py and dallas.py) at the same time.
globals.py - This program contains global configurations like your username and password that each of the above programs need to log into the PrivateEyePi server. You will need to edit this file to configure your system (explained in each tutorial).
alarmfunctionsr.py - This contains multiple common functions used by the above programs.
We will need to modify the globals.py script -
(because of the Chmod 777 we will need super cow powers to change this file)
It should be noted at this point you will need the serial number of the DS18B20 sensor (The directory name from adafruits tutorial)
sudo nano globals.py
We only care about the temperature sensor right now. You need to find the DallasSensorDirectory.append line, and change it to your directory.
Next We need to setup the username and password for the privateeyepi.com site.
So find: user = “” and put your email address that you used to sign up
just under that you’ll see password =””
IF you want your temperature in degrees fahrenheit you’ll need to also find the fahrenheit line and change that to True.
Once you are done editing the file (CTRL-O, CTRL-X) and are back at the command line, type sudo python dallas.py
Goto the PrivateEyePI site, login and click on Dashboard, you should see your PI and the tempature.
As I said Privateeyepi has a lot of other projects - so this is just a starting point.
UPDATE: Apr 7, 2015 - This demo was done about a year ago, it was with A Raspberry PI B - since doing this, there have been additions to Raspberry PI - such as the B+, and B 2 (It's being offered for Historical reasons)
Kd8Bxp'S Blog: 20140806 - Lesson 11 Ds18B20 Temperature Sensing: (Raspberry Pi Model B) >>>>> Download Now
ReplyDelete>>>>> Download Full
Kd8Bxp'S Blog: 20140806 - Lesson 11 Ds18B20 Temperature Sensing: (Raspberry Pi Model B) >>>>> Download LINK
>>>>> Download Now
Kd8Bxp'S Blog: 20140806 - Lesson 11 Ds18B20 Temperature Sensing: (Raspberry Pi Model B) >>>>> Download Full
>>>>> Download LINK Ts